How To Knit: Tubular Cast On - Waste Yarn Method
This cast on method creates a stretchy, rounded edge that flows beautifully into 1x1 or 2x2 ribbing – a great addition to your knitting toolbox! Our pattern experience manager Mary shows you how.
This tubular cast on method can be used for either 1x1 or 2x2 ribbing — for 2x2 ribbing, you'll rearrange your stitches after the initial steps. To keep your edges from flaring, work this technique on a needle 1-2 sizes smaller than your ribbing needle.
Written Steps
Set Up. Using waste yarn and your preferred cast on method, cast on with a relaxed tension the number of stitches directed for your project. Do not join.
Tip: For this Tubular Cast On method, you begin with approximately half of your required number of cast on stitches, and then increase until you have your required number. For an odd total of stitches, the general rule is to start with [(x-1)/2] + 1 stitches, where x is your odd number of required stitches. For an even number of stitches, the general rule is (x/2) + 1, where x is your even number of required stitches. When we use the Tubular Cast On in our patterns, we always state how many stitches to start with for each piece in each size.
Note that this tutorial is written for an odd number of total stitches.
Foundation Row (RS): With working yarn, purl all stitches in the row. This row is worked directly into your waste yarn stitches.
Row 1 (Increase Row; WS): *Knit 1, insert your L needle tip from front to back under the running thread between the stitch you just worked and the next stitch on the L needle, purl this stitch (increasing one). Repeat from * to last stitch, knit 1.
Note: For an even number of final stitches, you will need to decrease out the extra stitch cast on. You can do this at either the beginning or end of the row (depending on whether or not you are using a selvedge in your project) by working the running thread together with its following stitch. In our patterns, the instructions will indicate where and how to do this.
Row 2 (Tubular Row; RS): Slip 1 knitwise with yarn in back, knit 1, *slip 1 purlwise with yarn in front, knit 1. Repeat from * to last stitch, then slip 1 knitwise with yarn in back.
Row 3 (Tubular Row; WS): Purl 1, *slip 1 purlwise with yarn in front, knit 1. Repeat from * to last 2 stitches, slip 1 purlwise with yarn in front, purl 1.
Note: You can repeat a Tubular Row once more for a more polished look, but at this point, you can go ahead and begin your ribbing.
Stop here if you are working 1x1 ribbing. If you plan to work 2x2 ribbing, you will need to rearrange your stitches.
Rearrange Stitches for 2x2 Ribbing (worked with RS facing): Slip 1, *slip 1 stitch to CN and hold in front, slip 1 from L to R needle, slip 1 from CN to R needle, slip 2 stitches from L to R needle; repeat from * to last stitch, slip 1. Now slide your row of stitches across your circular needle so that your working yarn is once again on the L needle, ready to work a RS row.
Row 5 (Tubular Row; RS): Resuming with working yarn, {knit 1}, bring yarn to front, *slip 1 purlwise, bring yarn to back, knit 2, bring yarn to front, slip 1 purlwise; repeat from * to last stitch, {knit 1}.
Row 6 (Tubular Rows; WS): {knit 1}, *knit 1, bring yarn to front, slip 2 purlwise, bring yarn to back, knit 1; repeat from * to last stitch, {knit 1}.
You may remove the waste yarn from your tubular edge at any time by carefully snipping with scissors and unraveling it. However, we recommend that you wait until you’ve worked 1-2″ of fabric before removing. During this process, take care and make sure to avoid accidentally cutting any of your working yarn!
Tip: You can also leave your waste yarn in your project until you’ve finished, and even keep it in while it’s blocking. If you choose to leave it in, the waste yarn will protect your tubular edge from being damaged or overstretched during knitting and blocking.
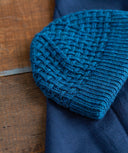
Your cast on edge should look nearly invisible, flowing into your ribbing. After completing the cast on (whether flat or in the round), simply knit the knit stitches and purl the purl stitches.
Shop our Latest Patterns


Checkers

Cyro


Diamants Cowl


Diamants Hat


Matches


Diverge


Grooves

Loomed