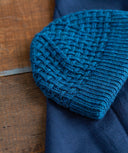
How To Knit: Ribbed Double Decrease
One of our favorite decrease methods for 1x1 ribbing, the Ribbed Double Decrease is completely reversible and elegantly maintains your ribbing pattern while decreasing two stitches. We show you how to work both right and left leaning ribbed double decreases, with and without a cable needle (a cable needle can be helpful while first learning this technique).
Written Steps
RIBBED DOUBLE DECREASE – RIGHT (RDD-R) WITH A CABLE NEEDLE
Step 1: Slip one stitch purlwise from your L to R needle.
Step 2: Slip one stitch purlwise to your cable needle and hold to back.
Step 3: Slip one stitch purlwise from your L to R needle.
Step 4: Transfer the stitch on your cable needle back to your L needle.
Step 5: Transfer the two slipped stitches on your R needle back to your L needle. The stitches on your L needle are now arranged as two knits followed by two purls.
Step 6: Knit 2 together (K2tog).
Step 7: Work a slip-slip-purl (SSP):
1. Slip two stitches knitwise one at a time from your L to R needle.
2. Transfer slipped stitches back to L needle in new orientation.
3. Purl the two stitches together through the back loops.
RIBBED DOUBLE DECREASE – LEFT (RDD-L) WITH A CABLE NEEDLE
Work steps 1–5 from RDD-R instructions above.
Step 6: Work a slip-slip-knit (SSK)
1. Slip two stitches knitwise one at a time from your L to R needle.
2. Transfer slipped stitches back to L needle in new orientation.
3. Knit the two stitches together through the back loops.
Step 7: Purl 2 together (P2tog).
Once you’ve mastered this technique, try it without a cable needle!
Jump to 8:18 in the video above to learn how.
Shop our Latest Patterns


Checkers


Cyro


Diamants Cowl


Diamants Hat


Matches


Diverge


Grooves

Loomed