How To: Embroidery on Knits
Embroidery is a great way to play with color and texture, use up yarn scraps, and customize your knitted pieces! Try it on fabrics with simple stitch patterns – think stockinette, garter, brioche or Shaker rib.
In our video tutorial, Brooklyn Tweed's pattern experience manager Mary teaches you four fun stitches to accent your knitwear.
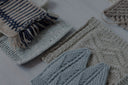
Embriodery Illustrations
Parallel Stitch
The parallel stitch creates a series of horizontal lines along your fabric. This stitch is great for highlighting columns in your fabric that are one or two stitches wide.

Parallel Stitch Steps:
Step 1: Cut a length of your embroidery yarn, thread your tapestry needle, and anchor the yarn on the wrong side of the fabric.
Step 2: Bring the needle through to the right side of the fabric, to the left of the column that you’re embroidering along.
Step 3: Go back through the fabric on the other side of your vertical column, then back to the front, bringing your needle up diagonally one or two rows below where you first brought the yarn up.
Step 4: Repeat until you’ve made a line of stitches to your liking.
You can also make an alternating two-color column by spacing your stitches twice as far apart, then stitching with a second color between your initial stitches.
Wheatear Stitch
The wheatear stitch resembles a chain stitch with little wings. This linear stitch also works well to highlight a column of stitches.

Wheatear Stitch Steps:
Step 1: Cut a length of your embroidery yarn, thread your tapestry needle, and anchor the yarn on the wrong side of the fabric.
Step 2: Bring the needle through to the right side of the fabric, to the left of the column that you’re embroidering along.
Step 3: Bring the needle back through to the wrong side in the center of the vertical column, below and to the right of where you brought it up.
Step 4: Bring the needle through to the right side along the right of the column, aligned with the top of the first stitch, then back down through the center of the column to meet the bottom of the first stitch.
Step 5: A few rows below in the center of the column, bring your needle through to the right side between the fabric and the two diagonal stitches, then back down in the same place you brought it up.
Step 6: Repeat until you’ve made a line of stitches to your liking.
2-Color Lock Stitch
The two-color lock stitch starts with a foundation of parallel stitches, "locked" together with stitches in a second color.

Two-Color Lock Stitch Steps:
Step 1: Work a column of parallel stitch in your first color.
Step 2: Thread your needle with a contrasting color of yarn and anchor the yarn on the wrong side of the fabric.
Step 3: Bring your needle up through the fabric at the right side of the topmost parallel stitch.
Step 4: Bring your needle under the parallel stitch from bottom to top, moving from left to right.
Step 5: Repeat with the next parallel stitch in the column to create a vertical "lock" stitch between the two parallel stitches.
Step 6: Continue down the column to create a line of lock stitches down the right side of your parallel stitches. Finish by bringing your needle back to the wrong side and anchoring your yarn.
Step 7: To work the left side, start back at the top with a new strand of yarn.
Step 8: Bring your needle up through the fabric at the left side of the topmost parallel stitch.
Step 9: Bring your needle under the parallel stitch from bottom to top, moving from right to left.
Step 10: Continue down the column to create a line of lock stitches down the left side of your parallel stitches. Finish by bringing your needle back to the wrong side and anchoring your yarn.
Four Legged Cross Stitch
The four-legged cross stitch creates a knot with four arms, like a little star. Sprinkle these across your fabric for a fun decorative effect.

Four-Legged Cross Stitch Steps:
Step 1: Cut a length of your embroidery yarn, thread your tapestry needle, and anchor the yarn on the wrong side of the fabric.
Step 2: Bring the needle through to the right side of the fabric where you want the top of your cross to be.
Step 3: Bring the needle back down through the fabric where you want the bottom of the cross to be, creating a vertical stitch.
Step 4: To create the right arm of your cross, bring your needle through to the right side of the fabric, aligned with the center of your vertical stitch and about half a stitch length to the right.
Step 5: To create the center knot and left arm of your cross, take your needle over the top of the vertical stitch toward the left and hold the yarn in place. Go under the vertical stitch, over your working yarn from right to left, then back down through the fabric to the left.
Shop our Latest Patterns


Checkers

Cyro
Diamants Cowl


Diamants Hat


Matches


Diverge


Grooves
Loomed